Over the years, I’ve made a lot of standing and running rigging for Transpac racers. From sleek little rocket sleds to boats you might expect to see a family cruising the San Juans on, they usually invest in new rigging for the rigors of the 2,200 mile trip from LA to Diamond Head. A lot of the boats that do this kind of long-distance, open ocean racing have adjustable backstays and/or running backstays. This allows the sailor to put more or less tension on the mast to affect the shape of the mainsail and jib, support the mast bend, reduce pumping, etc. In the old days, these might have been made from 7×19 wire rope since they often have to bend over some kind of block. As that wire gets older, the strands break, making nasty little barbs that will tear through anything they encounter (e.g. sails, lines, fingers, etc.). Now, we have the benefit of high tech fiber rigging like AmSteel and its numerous 12 strand single braid brethren. This is in essence an economical way to build PBO rigging yourself.
Some additional benefits of using fiber vs. wire are factors like fatigue (a material’s tendency to get more brittle after it has been bent), weight aloft which reduces the keel’s effectiveness, not to mention the ability for the sailor to splice a new one while underway instead of carrying swaging equipment.
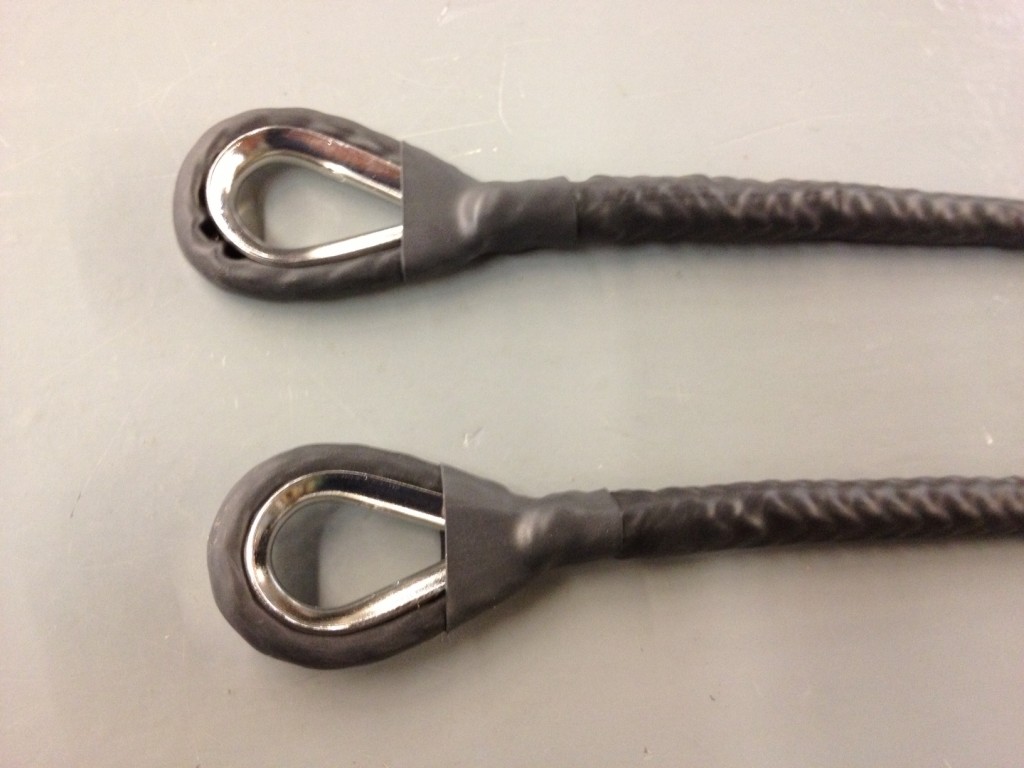
AmSteel has some UV resistance from the colored coating it comes from the factory with, but Spectra has very little unless you coat it with MaxiJacket or similar product. There is a product called VPE – Vectran with a Polyethylene coating (basically heat shrink) that is very popular for making running backs. The coating is there to protect the Vectran fibers from UV damage. You can make your own VPE from AmSteel and heat shrink tubing if needed. Here is the procedure for making your own adjustable backstay bridle or running backs. These are just a length of AmSteel with an eye spliced onto a heavy duty stainless steel thimble on both ends and the whole thing is covered in heat shrink.
We highly recommend being very proficient with the regular AmSteel splices (e.g. Brummel Lock and Modified Brummel Lock) before attempting this procedure. It is considerably more difficult to build the second end with the first eye and the heat shrink complicating matters. We also recommend practicing rolling an eye splice onto a thimble to get the knack for sizing the eye to the thimble and getting the splice onto the thimble.
We’re going to focus on just doing one end first. We’ll deal with the second end later in the procedure. Do not jump ahead and do anything to the second end until directed. We’re also going to leave the AmSteel long before determining where the finished length cut will be because we have to determine the shrinkage factor of the splices. If you’re not splicing off the spool, cut your AmSteel about five feet longer than your finished length. It may seem a bit wasteful, but it’s a cheap insurance policy to make sure your finished product is right. Plus, you can always use a piece of AmSteel for something.
- Make a reference mark on the AmSteel 4′ from the end. This will be used later to determine the amount of shrinkage the splice takes up.
- Make your marks for the tail bury and eye size for the appropriately sized heavy duty, stainless steel thimble. Record your tail bury length for future reference (example: 9″). Measure from your reference mark to the end of the eye, where it bends around the thimble. This will be your reference measurement (example: 2′ 10″).

- Add heat shrink to just the section that will create the eye around the thimble.

- Using the Modified Brummel Lock procedure, finish the eye splice onto the thimble on the first end.
- Lock stitch the taper, do not whip the eye as in the regular procedure.
- Measure the new distance from your reference mark to the end of the eye (example: 2′ 8″). The difference between the two measurements (example: 2″) is the amount of shrinkage you have to add to the other end for the second splice.
- When determining the finished length, make sure to account for how much it will stretch while under load. AmSteel is rated for 0.46% stretch at 10% of it’s breaking strength, so for a 30′ running back, here’s the calculation:
30′ x 12″ = 360″ x 0.46% = 1-5/8″ stretch
- From the end of the eye, measure your nominal finished length (example: 30′), add one half of the eye size (example: if thimble is 5″ around, add 2-1/2″), add the length of the tail bury (example: 9″) then subtract for the stretch factor (example: -1-5/8″).
Finished length + 1/2 thimble + tail bury – shrinkage
30′ + 2-1/2″ + 9″ -1-5/8″ = 30′ 9-7/8″
- Make your cut there. Measure back 9″ and make a mark, bend the AmSteel around your thimble on and make the second mark.
- Cover the section between the marks of the second eye with heat shrink as before.
- You should have 5 pieces of heat shrink on hand. First is one long piece that’s a close fit to the original rope diameter and approximately the finished length of your line. Sometimes this long piece is made up of more than one section to enable you to slide the heat shrink around to finish the splice on the second end and get complete heat shrink coverage of the entire piece. In addition to the small diameter long piece(s), you should have a medium diameter piece that transitions and covers the splice tapers and overlaps the small diameter piece by at least a foot. Third is a large diameter piece that covers the base of the thimble and overlaps the medium piece by a few inches. Slide all the heat shrink onto the line. You may need to figure out some way to fish the AmSteel down the long length(s) of the small diameter heat shrink. I’ve even resorted to running a string down through the heat shrink and using that to pull the tapered end of AmSteel.


- After all the heat shrink necessary to cover the entire line has been slipped over the AmSteel, scrunch the small diameter heat shrink far enough away from the second end to give you access to enough AmSteel for the second splice. You will probably need to pin the heat shrink back to do the splice, but make sure not to damage the heat shrink.

- The second eye will be the standard Brummel Lock because you can’t slide the first eye with the thimble through the second end. Make sure to build the eye the exact right size to roll onto the thimble. Too loose and the thimble won’t be captured, too tight and you won’t be able to get the thimble into the eye.
NOTE: Do not perform the bury part of the splice. If the finished eye is not the right size, you’ll be able to more easily redo the splice. Make sure you can roll the eye tightly over the thimble before burying the taper. Also, the Brummel lock is also considerably more difficult to do with the heat shrink over the eye. Make sure you dramatically enlarge the inverted part of the splice to wrestle the eye through. Be careful not to damage the heat shrink during the splicing process.


- Now, roll your spliced eye onto the thimble. It should be relatively difficult for a proper fit. Place the pointy end of the thimble into the crotch of the splice, then roll one side of the eye into the channel on the thimble. You should be able to just stretch and roll the eye over the end of the thimble so that it pops into place. Laying the assembly flat onto the work surface and massaging the roll into place with the heel of your palm sometimes helps.

- Perform the taper and bury part of the splice once you’re happy with the fit of the eye over the thimble.
- Lock stitch the buried taper.
- Load up the assembly to take out the stretch from the factory by using a block and tackle system or a winch mounted on the bench or a come-along. Let sit overnight.

- The next day, slide the medium and large heat shrink out of the way so you can get to the center of the small heat shrink. While the line is still loaded, starting from the center of the assembly, use a heat gun on the heat shrink and work your way to either end, but stop before you heat the medium heat shrink. Slide the medium and large heat shrink out of the way so you can heat up the ends of the small heat shrink near the buried tapers. NOTE: You should be able to see the weave of the AmSteel through the heat shrink but do not melt the heat shrink.

- Once the small diameter heat shrink is completely shrunk, slide the medium sized heat shrink up over the tapered bury and butt it up against the thimble. Heat shrink that into place. It should cover the small heat shrink by several inches.
- Once the medium heat shrink is in place, slide the large diameter heat shrink up over the base of the thimble and shrink it. It should cover the medium sized heat shrink enough for a good bond.

- OPTIONAL: Some people use the “cone” of large diameter heat shrink on the inside of the thimble as a form to pour a small amount of 5 minute epoxy into. This nominally keeps water out of the splice and supports the thimble when the line is loaded.
NOTE: When taking the load off the assembled line and transporting it out to the boat, do not bend or coil the line any more than absolutely necessary. This will relax the fibers and cause the line to draw back up, undoing the effect of loading it up overnight and possibly making it more difficult to install.
Congratulations! You’re done. Now you’re ready to install it onto the boat. Remember that since you accounted for the stretch, it might be a tight fit. Please feel free to post comments and/or questions.
Captain Chris Larsen